Vape Tricks 101: The Vape Cannon
How to Make The Vape Cannon
We’ve perfected our creation with an easy to follow step-by-step photo guide to show you exactly how easy it is to make your own Vape Cannon.
Device Recommended:
To create thick rings of vapor we recommend using either the INFERNO or LAVATUBE v2.5 while attempting this trick. These devices provide a great amount of vapor that will allow you to create a voluminous vape rings.
What you Need:
eCig Device
Open Area
Minimal to No Wind
Along with the following supplies:

**You will also need 1 Paperclip (not pictured)
Proper Device Set Up
Follow these steps to ensure your device is ready to make that thick vape ring:
Heating element is properly primed (if necessary)
If you are using an atomizer or cartomizer, be sure to check out our heating elements section of our Knowledge Base to be sure you've properly primed your heating element for best results.
eLiquid Level Is Full
Depending on the heating element you choose to use, you'll want to make sure your eliquid levels are full without over filling your heating element. This will allow more time to focus on mastering your vapor trick rather than worrying about your eliquid levels. View all 15 ml eliquid bottles > I View all 30 ml eliquid bottles >
Battery has healthy charge
Make sure your ecigarette battery has a healthy charge to avoid a break while you are filling up your Vape Cannon.
Favorite Drip Tip attached
Because having your favorite drip tip attached is a great way to start any vape trick!
All of the above tasks checked? You are ready to go!
Follow these Step-By-Step images to create your own Vape Cannon:
Step 1:
Take your Styrofoam cup and draw a circle in the middle that leaves a lip that is ½ of an inch wide all the way around. Afterwards, take your Styrofoam cup and use your butter knife to cut out a circle in the middle following the line that you drew.

Step 2:
Take the thin plastic bag and cut out a square piece that is big enough to put over the top of the cup with some plastic leftover on the sides.

Step 3:
Now place the square piece of plastic over the top of your cup. Now hold the plastic taut over the top of the cup, make sure that the entire top is covered with plastic.

Step 4:
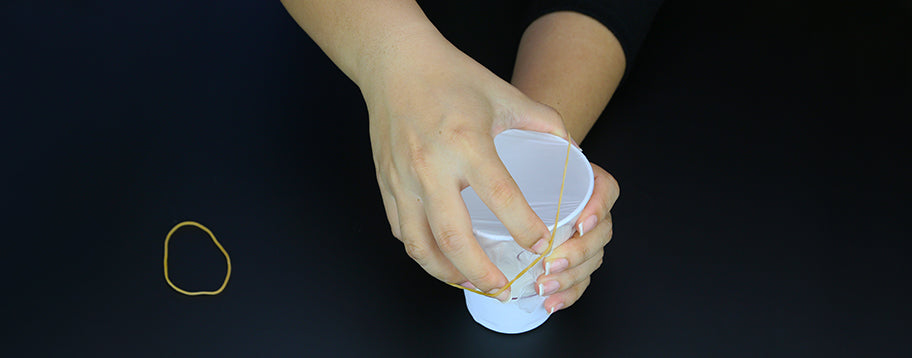
Take your rubber bands and stretch them over the top of the cup and adjust them so that they hold down all sides of the square plastic piece.

Your cup should look like this:

Step 5:
Cut off the excess plastic from the sides.

Step 6:
Now take your paperclip and gently puncture a small hole in the direct center of the tightened plastic. This tiny hole will allow you to fill the cannon with vapor more fully.

Step 7:
Now grab your device, take a long slow pull and blow the vapor slowly into the hole at the bottom of your cannon. Do this at least twice for fuller vape rings.

Step 8:
Carefully flip your cup with the small hole facing out to your audience and with your pointer finger gently tap the middle of the plastic. Voila!! View the rings your Vape Cannon is gloriously producing!

*Vaping Science Fun Fact!
Did you know that the technical term for a donut shape is “torus”? One of these floating rings is called a toroidal vortex. Air and vapor are spinning from the inside of the donut to the outside, it is this spin that keeps the torus together (and forms the ring) as it moves away from your Vape Cannon.


